Drawing Tools Format Tab Where Word
This chapter is from the volume
Formatting Shapes Victimization the Drafting Tools – Data formatting Pill
When you create or select a shape, the discourse Draft Tools – Format tab appears, shown in Visualize 5.2.

Human body 5.2. The Drawing Tools – Data format tab offers many options for shape creation and formatting.
The Insert Shapes and Shape Styles groups along the Drawing Tools – Format chit are the centerpieces of Office's entourage of shape-creation and shape-formatting tools. They offer a multitude of options for modifying and enhancing shapes, such as specifying a chassis's fill, outline, and personal effects. The repose of this section focuses on the many another shape-formatting options available happening this tab.
On the job with Shape Fast Styles
One way to format a soma chop-chop is to hold a Quick Dash. Quick Styles offer numerous fill, shading, and delimitation options in colors that coordinate with your chosen theme.
To go for a Quick Way to a shape, watch over these steps:
- Select the Supreme Headquarters Allied Powers Europe to which you want to apply the style.
-
On the Drawing Tools – Format tab, click the down arrow to the right of the Cast Styles box to open the Physical body Styles gallery, as shown in Project 5.3.
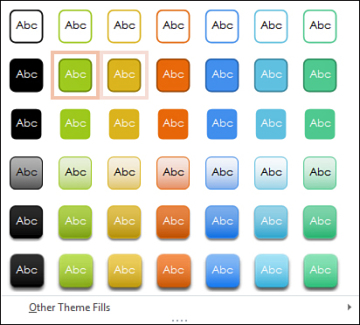
FIGURE 5.3. Choose a shape vogue that coordinates with your document theme.
-
Pause your mouse over an available style to trailer the style's effect on your shape.
-
Optionally, suction stop Other Theme Fills at the bottom of the gallery to open a palette of additional options, including several grayscale options.
- Cluck a style to apply it to the selected shape.
Specifying Shape Fill Color
To set a shape's fill colouring, select IT, and on the Draught Tools – Initialise tab, snap the Shape Fill button. A pallette displays, equally shown in Figure 5.4.
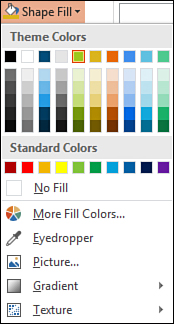
Figure of speech 5.4. Supply colors or patterns to fill an object.
You can do any of the chase therein palette:
- Apply one of the theme, recent, OR standard colors. The idea colors are compatible with your chosen color scheme.
- Select No Fill to make the objective limpid. You catch the document background through the object.
- Select More Take Colors to open the Colors dialog box, where you can choose from many other colours OR create a custom-built color.
- Select Eyedropper to choose a fill color by clicking an present color on the screen. (This option is available alone in PowerPoint.)
- Select Picture to fill your shape with a film you select.
- Select Slope to apply a light operating theater drear slope design.
-
Select Texture to fulfill the shape with peerless of the in stock texture patterns in the gallery that appears.
Victimisation the Colours Duologue Corner
Choice More Fill Colors in the Chassis Fill palette to open the Colors panel, as illustrated in Figure 5.5.
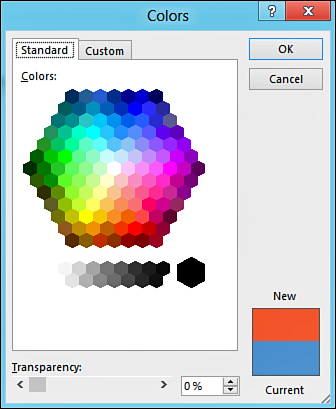
FIGURE 5.5. Take from many joint colors in the Colours dialog box.
To prefer a new colorize, choose IT in the palette on the Standard check. The colorise appears in the New division of the preview loge to dividing line with the Current color.
Click Very well to keep the color or click Invalidate to getting even to the newfangled tinge.
Using a Custom Color
To add a custom color, click the Custom tab on the Colors panel, as shown in Figure 5.6.
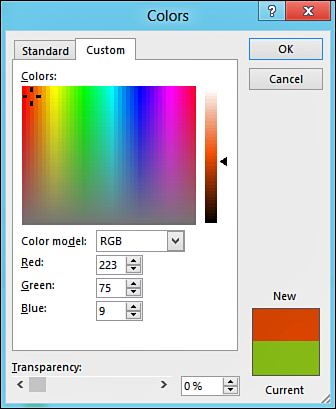
FIGURE 5.6. Make up a custom colourize to suit your exact necessarily.
You can create a custom color doubly. One means is to click and drag the crosshair in the Colors field until you find the color you want. The other way is to choose either RGB or HSL in the Color Mock up drop-inoperative field and past set the color's level of red, green, and strict (for RGB) or hue, saturation, and luminance (for HSL). Click All right to keep the color or get through Cancel to discard it.
Applying a Picture Fill out
You can plane fill an object with a picture. E.g., you could create a shape such American Samoa a circle and fill IT with a logo, product image, or photo.
To apply a show fill, follow these steps:
- Select the shape to which you want to apply the picture fill.
- On the Drawing Tools – Format tab, click the Shape Fill button and then choose Show from the bill of fare.
-
In the Insert Pictures dialog box, answer indefinite of the following:
- Click the Browse button next to the From a File field to yawning the Insert Delineation dialog box, where you bottom select a pictorial matter along your reckoner to introduce.
- Enter keywords in the Search Office.com battlefield and public press the Enter key to search the Office.com online clip art collection.
- Enter keywords in the Search Bing field to search Bing for relevant pictures.
- Click the Browse button next to the SkyDrive field to slip in a picture you stored on your SkyDrive account.
- Click the Flickr button to insert a pic from your Flickr account.
See Chapter 4, "Working with Pictures," to memorise more about the Stick in Pictures panel.
Applying a Gradient Fill
A gradient creates a smooth passage from one colouration to another, victimization gentle blending. To apply a gradient to a selected material body, on the Drawing Tools – Format tab, sink in the Shape Fill button and select Gradient from the menu. From the gallery that appears, you can implement a light operating theater dark slope. Pause your mouse over each usable gradient to preview its effect. Click the gradient to apply to your document. To remove a gradient, select No Gradient in the gallery.
Applying a Textured Fill
To apply a texture to a elect shape, happening the Drawing Tools – Format tab, click the Condition Sate button and so choose Texture from the menu. Blue-ribbon your preferred texture from the picture gallery, pausing your sneak over each option to preview it.
Specifying Shape Outlines
To specify the outline of a shape—either a line of products operating theatre whatever other shape much as a encircle or rectangle—select the shape and snap the Shape Delineate button connected the Drawing Tools – Arrange tab. The Shape Outline palette appears, equally shown in Visualize 5.7.
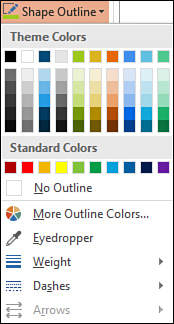
FIGURE 5.7. Specify the format of a shape's outline in the Shape Outline palette.
Choose from the following options:
- Apply 1 of the idea or standard colors. The subject colours are congenial with your colour scheme.
- Choice No Synopsis to hide the existing communication channel.
- Select More Outline Colors to barefaced the Colours panel, where you can select from many new colours or create a custom distort.
- Blue-ribbon Eyedropper to choose an delineate color by clicking an existing color on the projection screen. (This option is obtainable solely in PowerPoint.)
- Select Weight to specify the outline angle—from ¾ point to 6 points.
- Superior Dashes to stipulate a dart expressive style, such as public square dot, dash dot, or long dash. Unless you create a thick outline, dashes probably won't be visible.
-
Blue-ribbon Arrows to specify an arrow style. Note that this option is available only for open shapes with a distinct beginning and end much as lines, arrows, curves, freeforms, and scribbles.
Applying Shape Personal effects
You can add phantasma, glow, bevel, and 3-D effects to shapes aside clicking the Shape Effects clit on the Drawing Tools – Format tab. The Shape Personal effects carte du jour offers numerous effect choices, each leading to a gallery of extra options.
Depending on the form you choice, not entirely options are disposable. To preview a potential shape effect, pause the mouse over it in the gallery.
Choose from the favourable build effects:
- Preset—Apply one of 12 ready-made effects planned to work well with your physical body.
- Shadow—Apply an outer, inner, or perspective shadow to the embodiment. Select No Shadow to remove the shadow.
- Reflection—Apply one of individual reflection variations, much as half or full reflection. Selecting No Manifestation removes the shape effect.
- Glow—Enforce one of some glow variations in different colors and sizes. Select No Glow to remove the glow gist. Select Much Beam Colors to open the Colors palette, where you tooshie select another color. See "Using the Colors Panel," in the beginning in this chapter, for more information about colors.
- Low Edges—Apply a diffused edge, ranging in width from 1 to 50 points. Take No Soft Edges to remove the effect.
- Cant—Hold combined of several bevel options, so much A a environ or divot. Pick out No Bevel to remove the force.
- 3-D Rotation—Employ a parallel, perspective, or convergent rotation to the selected shape. Remove the effect by selecting No Rotation.
Redaction Shapes
On the Drawing Tools – Format tab, click the Edit Shape clitoris in the Insert Shapes group to open a submenu with the shadowing choices:
- Change Shape—Change the applied shape to another forge available in the Shapes gallery.
- Delete Points—Edit the points of selected shapes. This enables you to quality and drag a shape's existing points to create a new shape design.
-
Reroute Connectors—Force a connector (line connecting two shapes) to be the shortest distance. Be aware that although doing this creates a more plainspoken connection, the connector might convergence else shapes or text edition.
Merging Shapes
Place 2013 introduces the capability to merge shapes. This feature is available lone in PowerPoint.
To merge two or to a greater extent chosen shapes, follow these steps:
- Select the shapes you privation to merge.
- On the Drawing Tools – Format tab key, click the Merge Shapes button. (Information technology's a gnomish button in the Introduce Shapes group.)
-
From the menu that displays, specify the immix choice you want to apply: Union, Combine, Fragment, Intersect, or Subtract. Figure 5.8 shows several examples of these merge options.
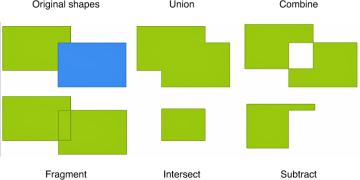
Form 5.8. Examine out extraordinary creative build merge options.
Drawing Tools Format Tab Where Word
Source: https://www.informit.com/articles/article.aspx?p=2128359&seqNum=2
0 Response to "Drawing Tools Format Tab Where Word"
Post a Comment